Metainformationen zur Seite
Übersetzungen dieser Seite:
- de
Zusammenbau des Paperduino
Bevor du beginnst, schaue bitte auf der Seite Benötigte Werkzeuge und Verwendete Bauteile!
Karton-Vorlage ausdrucken
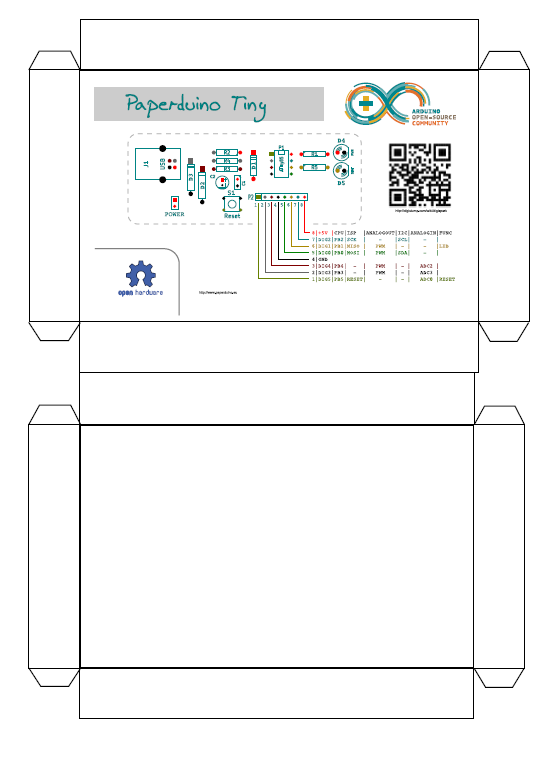
Ausdrucken
- Lade Dir die PDF-Datei herunter
- Drucke die PDF-Datei auf Foto-Karton aus.
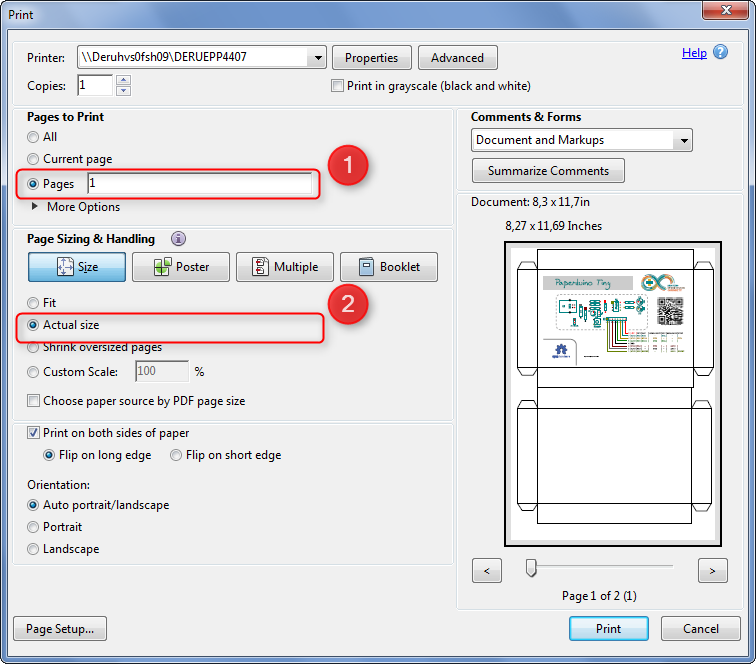
- Drucke zuerst Seite 1 aus.
- Achte beim Ausdrucken darauf, daß Aktuelle Größe angewählt ist:
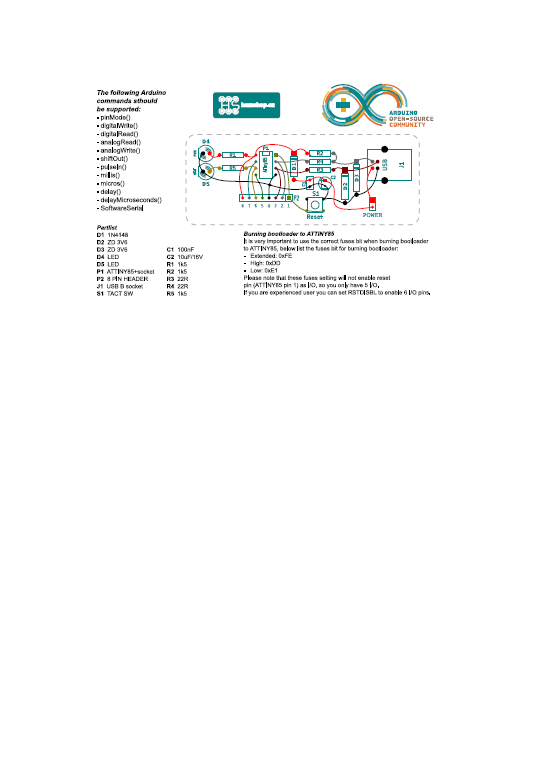
- Drehe den Karton im Drucker um und drucke dann die Seite 2 aus.
Unterseite der Schachtel bauen
TODO
Bauteile einsetzen
- Stanze mit einer Pinwand-Nadel Löcher in den Karton:
- Insert P1 - DIL8 socket to you paper board:
- Bend terminals of P1:
- Insert R1 - 1k5:
- Bend terminals of R1 and solder R1 with PIN 8 of P1:
- Insert D1 - 1N4148:
- Bend terminals of D1 and solder D1 with PIN 8 of P1:
- Insert R2 - 1k5:
- Insert R3 - 22R:
- Bend terminals of R2,R3 and solder them:
- Insert R4 - 22R:
- Bend terminals of R4 and solder them:
- Insert R5 - 1k5:
- Bend terminals of R5 and solder them:
- Insert D2 - zener diode 3V6:
- Insert D3 - zener diode 3V6:
- Bend terminals of D2, D3 and solder them:
- Insert S1 - Tact switch:
- Insert J1 - USB Connector:
- Conect S1 and J1:
- Insert C1 - ceramic capacitor 100nF:
- Bend terminals of C1 and connect them:
- Insert C2 - el. capacitor 10uF/16V double check polarity:
- Bend terminals of C2 and connect them:
- Insert D4, D5 and P2:
- Bend terminals and connect them:
- Insert Power switch:
- Make final wiring:
Congratulation, building is done!
Testing
- Double check all connections
- Do not insert the ATtiny85
- Connect to USB
- Put jumper to power switch
- Green LED (D4) lights - all is OK
- Remove Power switch jumper
- Insert ATtiny85 with programmed bootloader
- Go to Installing Arduino IDE and My first sketch
Improvements
You can secure bottom side with duct tape:
And you can cut card to smaller size:
You can use case from Tic Tac mints (large one with 100 mints) for you paperduino:
| Zurück | Weiter |
|---|---|
| ⇐ Verwendete Bauteile | Anschlüsse am Paperduino ⇒ |
Melden Sie sich an, um einen Kommentar zu erstellen.